2020年3月30日 星期一

FT-2000 +64 ARM64 Cross-Compiler env setup


------------------------------------------------------------
FT-2000 +64 ARM64 Cross-Compiler env setup
------------------------------------------------------------

Desktop PC:  Ram: 4G, disk: 512G
OS Image:   ubuntu-16.04.6-desktop-amd64.iso

kernel source: linux-4.9.150
https://git.kernel.org/pub/scm/linux/kernel/git/stable/linux.git/

1.  Install buntu-16.04.6-desktop-amd64.iso done.
2.  修改 /etc/apt/source.list 加入下面索引
    deb http://archive.kylinos.cn/kylin/KYLIN-ALL 4.0.2sp2-server-ft2000 main restricted universe multiverse
    deb http://mirrors.tuna.tsinghua.edu.cn/ubuntu/ xenial main restricted
    deb http://mirrors.tuna.tsinghua.edu.cn/ubuntu/ xenial-updates main restricted
    deb http://mirrors.tuna.tsinghua.edu.cn/ubuntu/ xenial universe
    deb http://mirrors.tuna.tsinghua.edu.cn/ubuntu/ xenial-updates universe
    deb http://mirrors.tuna.tsinghua.edu.cn/ubuntu/ xenial multiverse
    deb http://mirrors.tuna.tsinghua.edu.cn/ubuntu/ xenial-updates multiverse
    deb http://mirrors.tuna.tsinghua.edu.cn/ubuntu/ xenial-backports main restricted universe multiverse
    deb http://mirrors.tuna.tsinghua.edu.cn/ubuntu/ xenial-security main restricted
    deb http://mirrors.tuna.tsinghua.edu.cn/ubuntu/ xenial-security universe
    deb http://mirrors.tuna.tsinghua.edu.cn/ubuntu/ xenial-security multiverse

2.  安裝下列軟件
    apt-get update
    apt-get install -y libncurses-dev u-boot-tools libssl-dev flex bison build-essential bc libncurses5-dev
   
    apt-get install libncurses-dev
    apt-get install u-boot-tools
    apt-get install libssl-dev
    apt-get install flex
    apt-get install bison
    apt-get install gcc-aarch64-linux-gnu //在arm64系統不用裝
    apt-get install build-essential
    apt-get install bc
    apt-get install libncurses5-dev
   
3.  修正 ~/.bashrc 加入下面
    export ARCH=arm64                     
    export CROSS_COMPILE=aarch64-linux-gnu-
    保存退出後,執行 source ~/.bashrc 使其生效。
    使用命令 aarch64-linux-gnu-gcc –v 可以看到gcc 版本號為 gcc version 5.4.0 20160609;
    至此,飛騰處理器交叉編譯環境搭建完畢。


安裝重編核心所需要的工具
(1) gcc
(2) make
(3) build-essential (包含g++和linux-kernel-headers)

# sudo apt-get install gcc
# sudo apt-get install make
# sudo apt-get install build-essential

下載Linux Kernel
# sudo apt-get install linux-source-2.6.15
# cd /usr/src/
# sudo tar jxf linux-source-2.6.15.tar.bz
# cd linux-source-2.6.15

用make menuconfig設定核心參數需先安裝ncurses
# sudo apt-get install libcdk-dev

設定核心參數
# sudo make menuconfig

重編與安裝核心
# sudo make
# sudo make modules
# sudo make modules_install
# sudo make install

要使用mkinitrd需先安裝initrd-tools
# sudo apt-get install initrd-tools

使用mkinitrd產生初始化檔案系統所需的鏡像檔initrd.img
(kernel版本名稱可以去/lib/modules看目錄名稱得知)
# sudo mkinitrd -o /boot/initrd.img-2.6.15.7-ubuntu1 2.6.15.7-ubuntu1

編輯/boot/grub/menu.list
# sudo vim /boot/grub/menu.list
參考原來的設定新加入以下內容

title Ubuntu, kernel 2.6.15.7-ubuntu1
root (hd0,0)
kernel /boot/vmlinuz-2.6.15.7-ubuntu1 root=/dev/sda1 ro quiet splash
initrd /boot/initrd.img-2.6.15.7-ubuntu1
savedefault
boot

編輯好後重新開機

# sudo reboot

在開機倒數畫面按ESC進入開機管理員,選擇新的Kernel開機   


*** root@Kylin:/home/accusys/linux-4.9.214# apt-cache search make-kpkg               
    kernel-package - utility for building Linux kernel related Debian packages
    apt-get install  kernel-package
   
   
***
    ==================================
    Debian / Ubuntu Linux 核心編譯
    ==================================
   
    Debian sid / Ubuntu xenial
   
    編譯Linux核心安裝所需的套件
    $ sudo apt-get install git fakeroot build-essential ncurses-dev xz-utils kernel-package libssl-dev
   
    下載Linux核心原始碼
    $ wget https://www.kernel.org/pub/linux/kernel/v4.x/linux-4.5.tar.xz
    $ tar xvf linux-4.5.tar.xz
   
    設定Linux核心
    $ cd linux-4.5
    ### 清除先前編譯的暫存檔案(新解開的壓縮檔可跳過此步驟)
    $ sudo make mrproper
   
    ### 載入系統核心設定
    $ cp /boot/config-$(uname -r) .config
   
    修改核心功能與驅動程式設定項目
    $ make menuconfig
   
    編譯Linux核心並建立DEB套件包
    $ make-kpkg clean
    $ sudo fakeroot make-kpkg --initrd kernel_image kernel_headers
    或
    $ sudo fakeroot make-kpkg --initrd --revision=1.0 --append-to-version -20190726.kylin.server-generic kernel_image kernel_headers
   
    安裝核心
    $ sudo dpkg -i linux-image-*.deb
    $ sudo dpkg -i linux-headers-*.deb
       
    1、--initrd選項會讓make-kpkg自動幫我們生成initramfs;
    2、--revision會給生成的deb檔案加上一個版本資訊。這個引數只是影響到檔名,如果不指定,預設會是“10.00.Custom”;
    3、--append-to-version也是一種版本資訊,它不僅出現在deb安裝包的檔名裡,也會影響到kernel的名稱,比如本例中,核心更新完成之後,用“uname -r”察看會得到“2.6.36-20110107”;


***這也不是一天兩天了,常常會對 Linux 的某些 Driver 做些 Patches,或對某些 Module 做修改,
    但每次要 compile 出那幾個 ko 檔時就很頭痛,既然只是修改特定的 module ,又不用重新做出新的 kernel image,
    為何每次都要將整個 kernel 重新 compile 呢?其實有方法可以只編譯特定的 kernel module 以並免不必要的時間浪費。
   
    切換到目標 module 的目錄下,然後執行:
    make script
    make prepare
    make -C /usr/src/linux SUBDIRS=$PWD modules
   
    ※粗體字部份改成 kernel source 的位置即可。
    Linux Linux Kernel
    留言
   
    Chen, Ping-Hsun (penk)2008年9月11日 下午11:28
    在 Ubuntu 上我是習慣 make M=/your/path/to/module/directory -C /lib/module/$(uname -r)/build
   
   
***Update the initramfs of the newest kernel:
   update-initramfs -u
***Create the initramfs for a specific kernel:
   update-initramfs -c -k 2.6.18-1-686
 

Ubuntu 18.04 LTS add or remove user


#  sudo adduser username

Adding user `username' ...
Adding new group `username' (1001) ...
Adding new user `username' (1001) with group `username' ...
Creating home directory `/home/username' ...
Copying files from `/etc/skel' ...
You will be asked a series of questions. The password is required and all other fields are optional.

Enter new UNIX password:
Retype new UNIX password:
passwd: password updated successfully
Changing the user information for username
Enter the new value, or press ENTER for the default
Full Name []:
Room Number []:
Work Phone []:
Home Phone []:
Other []:
Is the information correct? [Y/n]
Finally, confirm that the information is correct by entering Y.

By default on Ubuntu, members of the group sudo are granted with sudo access.
If you want the newly created user to have administrative rights, add the user to the sudo group:

#  sudo usermod -aG sudo username


To delete the user, without deleting the user files, run:
sudo deluser username

If you want to delete and the user’s home directory and mail spool use the --remove-home flag: \
sudo deluser --remove-home username

2020年3月27日 星期五

Ubuntu 16.04 網路設定

先查詢網路設備 ifconfig or networkctl

# ifconfig -a
ens33     Link encap:Ethernet  HWaddr 00:0c:29:da:d1:b0 
          inet addr:10.10.8.57  Bcast:10.10.8.255  Mask:255.255.255.0
          inet6 addr: fe80::20c:29ff:feda:d1b0/64 Scope:Link
          UP BROADCAST RUNNING MULTICAST  MTU:1500  Metric:1
          RX packets:9149 errors:0 dropped:45 overruns:0 frame:0
          TX packets:963 errors:0 dropped:0 overruns:0 carrier:0
          collisions:0 txqueuelen:1000
          RX bytes:950063 (950.0 KB)  TX bytes:408797 (408.7 KB)

lo        Link encap:Local Loopback 
          inet addr:127.0.0.1  Mask:255.0.0.0
          inet6 addr: ::1/128 Scope:Host
          UP LOOPBACK RUNNING  MTU:65536  Metric:1
          RX packets:264 errors:0 dropped:0 overruns:0 frame:0
          TX packets:264 errors:0 dropped:0 overruns:0 carrier:0
          collisions:0 txqueuelen:1
          RX bytes:19200 (19.2 KB)  TX bytes:19200 (19.2 KB)

# networkctl -a
WARNING: systemd-networkd is not running, output will be incomplete.

IDX LINK             TYPE               OPERATIONAL SETUP   
  1 lo               loopback           n/a         unmanaged
  2 ens33            ether              n/a         unmanaged

2 links listed.


**  ubuntu 16.04 系統 基本為DHCP模式
      修正為分配固定 ip

# vi /etc/network/interfaces

# This file describes the network interfaces available on your system
# and how to activate them. For more information, see interfaces(5).

source /etc/network/interfaces.d/*

# The loopback network interface
auto lo
iface lo inet loopback

# The primary network interface
#auto ens33
#iface ens33 inet dhcp

auto ens33
iface ens33 inet static
address 10.10.8.57
netmask 255.255.255.0
gateway 10.10.8.254
dns-nameservers 10.10.0.9 10.10.0.10

重新啟用網路設定
# /etc/init.d/networking restart


2020年3月26日 星期四

FT-2000 +64 ARM64 Cross-Compiler env setup


------------------------------------------------------------
FT-2000 +64 ARM64 Cross-Compiler env setup
------------------------------------------------------------

Desktop PC:  Ram: 4G, disk: 512G
OS Image:   ubuntu-16.04.6-desktop-amd64.iso

kernel source: linux-4.9.150
https://git.kernel.org/pub/scm/linux/kernel/git/stable/linux.git/

1.  Install buntu-16.04.6-desktop-amd64.iso done.
2.  修改 /etc/apt/source.list 加入下面索引
    deb http://archive.kylinos.cn/kylin/KYLIN-ALL 4.0.2sp2-server-ft2000 main restricted universe multiverse
    deb http://mirrors.tuna.tsinghua.edu.cn/ubuntu/ xenial main restricted
    deb http://mirrors.tuna.tsinghua.edu.cn/ubuntu/ xenial-updates main restricted
    deb http://mirrors.tuna.tsinghua.edu.cn/ubuntu/ xenial universe
    deb http://mirrors.tuna.tsinghua.edu.cn/ubuntu/ xenial-updates universe
    deb http://mirrors.tuna.tsinghua.edu.cn/ubuntu/ xenial multiverse
    deb http://mirrors.tuna.tsinghua.edu.cn/ubuntu/ xenial-updates multiverse
    deb http://mirrors.tuna.tsinghua.edu.cn/ubuntu/ xenial-backports main restricted universe multiverse
    deb http://mirrors.tuna.tsinghua.edu.cn/ubuntu/ xenial-security main restricted
    deb http://mirrors.tuna.tsinghua.edu.cn/ubuntu/ xenial-security universe
    deb http://mirrors.tuna.tsinghua.edu.cn/ubuntu/ xenial-security multiverse

2.  安裝下列軟件
    apt-get update
    apt-get install -y libncurses-dev u-boot-tools libssl-dev flex bison build-essential bc libncurses5-dev
   
    apt-get install libncurses-dev
    apt-get install u-boot-tools
    apt-get install libssl-dev
    apt-get install flex
    apt-get install bison
    apt-get install gcc-aarch64-linux-gnu //在arm64系統不用裝
    apt-get install build-essential
    apt-get install bc
    apt-get install libncurses5-dev
   
3.  修正 ~/.bashrc 加入下面
    export ARCH=arm64                     
    export CROSS_COMPILE=aarch64-linux-gnu-
    保存退出後,執行 source ~/.bashrc 使其生效。
    使用命令 aarch64-linux-gnu-gcc –v 可以看到gcc 版本號為 gcc version 5.4.0 20160609;
    至此,飛騰處理器交叉編譯環境搭建完畢。


安裝重編核心所需要的工具
(1) gcc
(2) make
(3) build-essential (包含g++和linux-kernel-headers)

# sudo apt-get install gcc
# sudo apt-get install make
# sudo apt-get install build-essential

下載Linux Kernel
# sudo apt-get install linux-source-2.6.15
# cd /usr/src/
# sudo tar jxf linux-source-2.6.15.tar.bz
# cd linux-source-2.6.15

用make menuconfig設定核心參數需先安裝ncurses
# sudo apt-get install libcdk-dev

設定核心參數
# sudo make menuconfig

重編與安裝核心
# sudo make
# sudo make modules
# sudo make modules_install
# sudo make install

要使用mkinitrd需先安裝initrd-tools
# sudo apt-get install initrd-tools

使用mkinitrd產生初始化檔案系統所需的鏡像檔initrd.img
(kernel版本名稱可以去/lib/modules看目錄名稱得知)
# sudo mkinitrd -o /boot/initrd.img-2.6.15.7-ubuntu1 2.6.15.7-ubuntu1

編輯/boot/grub/menu.list
# sudo vim /boot/grub/menu.list
參考原來的設定新加入以下內容

title Ubuntu, kernel 2.6.15.7-ubuntu1
root (hd0,0)
kernel /boot/vmlinuz-2.6.15.7-ubuntu1 root=/dev/sda1 ro quiet splash
initrd /boot/initrd.img-2.6.15.7-ubuntu1
savedefault
boot

編輯好後重新開機

# sudo reboot

在開機倒數畫面按ESC進入開機管理員,選擇新的Kernel開機   


*** root@Kylin:/home/accusys/linux-4.9.214# apt-cache search make-kpkg               
    kernel-package - utility for building Linux kernel related Debian packages
    apt-get install  kernel-package
   
   
***
    ==================================
    Debian / Ubuntu Linux 核心編譯
    ==================================
   
    Debian sid / Ubuntu xenial
   
    編譯Linux核心安裝所需的套件
    $ sudo apt-get install git fakeroot build-essential ncurses-dev xz-utils kernel-package libssl-dev
   
    下載Linux核心原始碼
    $ wget https://www.kernel.org/pub/linux/kernel/v4.x/linux-4.5.tar.xz
    $ tar xvf linux-4.5.tar.xz
   
    設定Linux核心
    $ cd linux-4.5
    ### 清除先前編譯的暫存檔案(新解開的壓縮檔可跳過此步驟)
    $ sudo make mrproper
   
    ### 載入系統核心設定
    $ cp /boot/config-$(uname -r) .config
   
    修改核心功能與驅動程式設定項目
    $ make menuconfig
   
    編譯Linux核心並建立DEB套件包
    $ make-kpkg clean
    $ sudo fakeroot make-kpkg --initrd kernel_image kernel_headers
    或
    $ sudo fakeroot make-kpkg --initrd --revision=1.0 --append-to-version -20190726.kylin.server-generic kernel_image kernel_headers
   
    安裝核心
    $ sudo dpkg -i linux-image-*.deb
    $ sudo dpkg -i linux-headers-*.deb
       
    1、--initrd選項會讓make-kpkg自動幫我們生成initramfs;
    2、--revision會給生成的deb檔案加上一個版本資訊。這個引數只是影響到檔名,如果不指定,預設會是“10.00.Custom”;
    3、--append-to-version也是一種版本資訊,它不僅出現在deb安裝包的檔名裡,也會影響到kernel的名稱,比如本例中,核心更新完成之後,用“uname -r”察看會得到“2.6.36-20110107”;


***這也不是一天兩天了,常常會對 Linux 的某些 Driver 做些 Patches,或對某些 Module 做修改,
    但每次要 compile 出那幾個 ko 檔時就很頭痛,既然只是修改特定的 module ,又不用重新做出新的 kernel image,
    為何每次都要將整個 kernel 重新 compile 呢?其實有方法可以只編譯特定的 kernel module 以並免不必要的時間浪費。
   
    切換到目標 module 的目錄下,然後執行:
    make script
    make prepare
    make -C /usr/src/linux SUBDIRS=$PWD modules
   
    ※粗體字部份改成 kernel source 的位置即可。
    Linux Linux Kernel
    留言
   
    Chen, Ping-Hsun (penk)2008年9月11日 下午11:28
    在 Ubuntu 上我是習慣 make M=/your/path/to/module/directory -C /lib/module/$(uname -r)/build
   
   
***Update the initramfs of the newest kernel:
   update-initramfs -u
***Create the initramfs for a specific kernel:
   update-initramfs -c -k 2.6.18-1-686
 

製作ubuntu arm64的rootfs檔案


------------------------------------------------------------
** 如何製作ubuntu arm64的rootfs檔案 **
source form: https://www.itread01.com/content/1545126143.html
------------------------------------------------------------

  **建立 ubuntu-rootfs
    $ mkdir ~/ubuntu-rootfs && cd ubuntu-rootfs

  **下載最新的arm64 ubuntu release image
    $ wget http://cdimage.ubuntu.com/ubuntu-base/releases/18.04/release/ubuntu-base-18.04-base-arm64.tar.gz
    $ tar -xpf ubuntu-base-18.04-base-arm64.tar.gz

    我們解壓縮後,就可以直接刪除這個下載的ubuntu-base-16.04.2-base-arm64.tar.gz檔案了。ls 命令之後的樣子是這樣的:
    [email protected]:~/ubuntu-rootfs$ ls
    bin   dev  home  media  opt   root  sbin  sys  usr
    boot  etc  lib   mnt    proc  run   srv   tmp  var
   
    或是抓取 ubuntu-18.04.4-server-arm64.iso
    mount ubuntu-18.04.4-server-arm64.iso rootfs_18.04
    在 install 目錄下 filesystem.squashfs,這就是根文件系統
    安裝解壓縮工具: apt-get install squashfs-tools
    解壓縮 unsquashfs filesystem.squashfs 會得到 squashfs-root
    內容會得到 filesystem
    bin  boot  dev  etc  home  lib  media  mnt  opt  proc  root  run  sbin  srv  sys  tmp  usr  var
 
  **安裝 qemu-user-static
    我們可以使用如下的指令來完成對qemu-user-static的安裝
    $ pwd
    /home/user/ubuntu-rootfs
    $ apt-get install qemu-user-static
    $ cp /usr/bin/qemu-aarch64-static  usr/bin
    $ cp -b /etc/resolv.conf etc/
    在這裡我們要注意的是我們針對arm64的qemu-user-static安裝的檔案是qemu-aarch64-static。
   
  **mount proc, sys, dev, dev/pts到新的檔案系統
    https://raw.githubusercontent.com/psachin/bash_scripts/master/ch-mount.sh
    利用一個簡單的ch-mount.sh指令碼來完成這個動作。它可以幫我們mount及unmount。我們把下載好的指令碼置於ubuntu-rootfs目錄的上一級目錄,並做如下的處理:

    [email protected]:~$ chmod a+x ch-mount.sh
    [email protected]:~$ sudo bash ch-mount.sh -m ubuntu-rootfs/
    [sudo] user 的密碼:
    MOUNTING
    [email protected]:/#
    這樣我們就進入到chroot的環境中了。
   
  **更新系統並安裝所需要的包
    運用如下的命令來更新系統,並安裝所需要的包。依賴網路環境,安裝的時間可能會有差異。
    [email protected]:/# apt-get update
    [email protected]:/# apt-get install -y language-pack-en-base sudo ssh net-tools ethtool wireless-tools
                         lxde xfce4-power-manager xinit xorg network-manager iputils-ping rsyslog lightdm-gtk-greeter
                         alsa-utils gnome-mplayer lightdm bash-completion lxtask htop python-gobject-2 python-gtk2 synaptic
 
    修正版: 只安裝基本需求
    apt-get install -y language-pack-en-base sudo ssh net-tools ethtool wireless-tools network-manager ifupdown iputils-ping rsyslog htop vim
   
    sudo apt-get update
    安裝make rool: sudo apt-get install  gcc automake autoconf libtool make
    安裝vim 編輯器:apt-get install vim
    安裝固件(顯卡固件包含在裡面,必須安裝):apt-get install linux-firmware(如果已拷貝,則不必安裝)
    安裝libncurses5-dev,內核配置make menuconfig 時依賴的庫:apt-get install libncurses5-dev
    安裝內核編譯所需工具:apt-get install bc
    安裝u-boot-tools,編譯uImage 用:apt-get install u-boot-tools
    安裝gcc g++: apt-get install gcc g++
    安裝gfortran: apt-get install gfortran
    安裝ssh: apt-get install ssh
    安裝ifupdown,自動開啟網卡: apt-get install ifupdown
    安裝網絡工具nettools: apt-get install net-tools
    如果需要安裝圖形界面:
    apt-get install xinit gdm3 ubuntu-desktop
    安裝完後重啟系統,這時可以進入圖形界面了。有時可能會遇到鼠標和鍵槃無法使用情況,在內核選項中將
    INPUT_EVDEV 選上即可。
    這時候會提醒語言包的錯誤:
    修改/etc/default/locale 文件,添加以下內容
    LANG="en_US.UTF-8"
    LANGUAGE="en_US:en"
    LC_ALL="en_US.UTF-8"
    執行命令locale-gen en_US.UTF-8 即可。
    這時sudo su 還無法切換到root 用戶,在root 登陸下修改:
    chown root:root /usr/bin/sudo
    chmod 4755 /usr/bin/sudo
    這時在普通用戶下sudo su 就可以臨時切換到root 了。
    如果出現root ssh 無法登陸現象,在/etc/ssh/sshd_config 文件中修改PermitRootLogin yes
    重啟ssh 服務,再次登陸就可以了。
 
  **從kernel source compiler driver module 安裝到 rootfs
    make modules_install INSTALL_MOD_PATH=/home/sam/rootfs/rootfs_18.04
   
  **設置root密碼
    passwd root
 
  **創建用戶
    adduser accusys
   
  **設置主機名稱和本機IP
    echo "i.MX6" > /etc/hostname
    echo "127.0.0.1 localhost" >> /etc/hosts
    echo "127.0.1.1 i.MX6" >> /etc/hosts
   
  **配置串口和網絡dhcp
    首先配置串口,這裏踩了幾次坑,下載到板子上以後發現串口無法輸出到超級終端,找了很多方案,終於試出來了,需要做一個鏈接才行。
    ln -s /lib/systemd/system/getty@.service /etc/systemd/system/getty.target.wants/getty@ttymxc0.service
    由於我用的是i.mx6ul的平臺,需要添加一個名?getty@ttymxc0.service的鏈接,連接到getty@.service服務。i.mx的平臺是ttymxc0,其他平臺的名字就不清楚了。如果確定不了名字,一個比較笨的方法就是先把製作好的根文件系統下載到開發板上,超級終端上查看打印出來的log,會在 waiting for device dev-ttymxc0.device 時出現 [Time out] ,Dependency failed for Serial Getty on ttymxc0. 由此就可以知道了。
   
   
  **配置DHCP,也可以等下載到開發板之後在配置,但?動時會很慢。
    echo auto eth0 > /etc/network/interfaces.d/eth0
    echo iface eth0 inet dhcp >> /etc/network/interfaces.d/eth0
    /etc/init.d/networking restart

  **系統基礎改造
    # useradd -s '/bin/bash' -m -G adm,sudo yourusername
    # echo "Set password for yourusername:"
    # passwd yourusername
    # echo "Set password for root:"
    # passwd root
   
  **設定主機名
    # echo 'ubuntu.yourusername' > /etc/hostname
   
  **設定自動更新DNS
    # apt-get install resolvconf
    # dpkg-reconfigure resolvconf
   
  **新增主機入口到/etc/hosts:
    127.0.0.1    localhost
    127.0.1.1    yourhostname
   
  **設定timezone
    # apt-get install tzdata
    # dpkg-reconfigure tzdata
   
  **在lib目錄下建立目錄並拷入我們自己硬體相關的模組檔案
    我們可以從我們的host中拷入我們想要的arm64的模組到系統中,比如:
    # cp -r /opt/out/modules/3.4.5 ~/ubuntu-rootfs/lib/modules
    在這裡,我們把我們想要定製的包拷入到lib之下的modules中。
   
  **選項:啟動serial console登入
    我們可以建立/etc/init/ttyS0.conf檔案,並寫入如下的內容:
   
    start on stopped rc or RUNLEVEL=[12345]
    stop on runlevel [!12345]
    respawn
    exec /sbin/getty -L 115200 ttyS0 vt102
   
    在host中可以同如下的命令來登入:
    $ sudo start ttyS0
    等我們完成上面的工作後,我們就可以開始製作我們的rootfs檔案了。在上面我們已經把我們所需要的檔案拷入到相應的檔案目錄之中了。
   
  **退出並製作可燒錄的韌體
    [email protected]:/# exit         
    exit
    [email protected]:~$ pwd
    /home/user
    [email protected]:~$ ./ch-mount.sh -u ubuntu-rootfs
   
  **使用dd指令製作空的韌體容器
    $ dd if=/dev/zero of=ubuntu-rootfs.img bs=1M count=2048
    $ sudo  mkfs.ext4  ubuntu-rootfs.img
   
  **將arm64檔案系統內容製作到ubuntu-rootfs.img
    $ mkdir  ubuntu-mount
    $ sudo mount ubuntu-rootfs.img ubuntu-mount/
    $ sudo cp -rfp ubuntu-rootfs/*  ubuntu-mount/
    $ sudo umount ubuntu-mount/
    $ e2fsck -p -f ubuntu-rootfs.img
    $ resize2fs -M ubuntu-rootfs.img
    這樣最終,我們生成了我們所需要的ubuntu-rootfs.img檔案:
   
    [email protected]:~$ ls ubuntu-rootfs.img -hal
    -rw-rw-r-- 1 user user 2.0G 10月 31 16:23 ubuntu-rootfs.img
    [email protected]:~$ file ubuntu-rootfs.img
    ubuntu-rootfs.img: Linux rev 1.0 ext4 filesystem data, UUID=9ed3cd8b-e81a-4ec9-a8e0-bd185f223936 (needs journal recovery) (extents) (large files) (huge files)
   
  **參考文章:
    https://gnu-linux.org/building-ubuntu-rootfs-for-arm.html
    https://olimex.wordpress.com/2014/07/21/how-to-create-bare-minimum-debian-wheezy-rootfs-from-scratch/
   
ch-mount.sh ---------------------------------------->
#!/bin/bash
#

function mnt() {
    echo "MOUNTING"
    sudo mount -t proc /proc ${2}proc
    sudo mount -t sysfs /sys ${2}sys
    sudo mount -o bind /dev ${2}dev
    sudo mount -o bind /dev/pts ${2}dev/pts
    sudo chroot ${2}
}

function umnt() {
    echo "UNMOUNTING"
    sudo umount ${2}proc
    sudo umount ${2}sys
    sudo umount ${2}dev/pts
    sudo umount ${2}dev

}

if [ "$1" == "-m" ] && [ -n "$2" ] ;
then
    mnt $1 $2
elif [ "$1" == "-u" ] && [ -n "$2" ];
then
    umnt $1 $2
else
    echo ""
    echo "Either 1'st, 2'nd or both parameters were missing"
    echo ""
    echo "1'st parameter can be one of these: -m(mount) OR -u(umount)"
    echo "2'nd parameter is the full path of rootfs directory(with trailing '/')"
    echo ""
    echo "For example: ch-mount -m /media/sdcard/"
    echo ""
    echo 1st parameter : ${1}
    echo 2nd parameter : ${2}
fi
ch-mount.sh <----------------------------------------


Samba

**編輯 /etc/samba/smb.conf
    [accusys shared]       
        comment = accusys Shared Files
        path = /home/accusys/
        guest ok = no
        browseable = yes
        writable = yes
**sudo smbpasswd -a accusys
**sudo /etc/init.d/samba restart

Ubuntu 18.04 Mallanox ConnectX-5 EDR + 100Gbe (Cx556A) setting


Ubuntu 18.04 Mallanox ConnectX-5 EDR + 100Gbe (Cx556A) setting

**  check device.

# lspci | grep Mellanox
01:00.0 Ethernet controller: Mellanox Technologies MT27800 Family [ConnectX-5]
01:00.1 Ethernet controller: Mellanox Technologies MT27800 Family [ConnectX-5]

**  check driver.
# lspci -k
01:00.0 Ethernet controller: Mellanox Technologies MT27800 Family [ConnectX-5]
        Subsystem: Mellanox Technologies MT27800 Family [ConnectX-5]
        Kernel driver in use: mlx5_core
        Kernel modules: mlx5_core
01:00.1 Ethernet controller: Mellanox Technologies MT27800 Family [ConnectX-5]
        Subsystem: Mellanox Technologies MT27800 Family [ConnectX-5]
        Kernel driver in use: mlx5_core
        Kernel modules: mlx5_core

**  driver install
    1.  基本Ubuntu 18.04 已支援, 從上面確定 mlx5_core 已裝。
    2.  若沒有安裝可以上網找尋 OFED driver,原廠有提供相關driver可以安裝
        透過 https://www.mellanox.com/products/infiniband-drivers/linux/mlnx_ofed 下載
        現階段只有Ubuntu18.04 支援 aarch64 系統.
        解壓縮後執行 ./mlnxofedinstall 即可安裝完成.
        可參考 https://community.mellanox.com/s/article/howto-install-mlnx-ofed-driver

**  Important Packages and Their Installation
#apt-get install rdma-core
    rdma-core   RDMA core userspace libraries and daemons

#apt-get install opensm
    opensm: InfiniBand Subnet Manager
    opensm-libs Libraries used by OpenSM and included utilities
    opensm      OpenIB InfiniBand Subnet Manager and management utilities

#apt-get install Ibutils
    Ibutils: OpenIB Mellanox InfiniBand Diagnostic Tools
    ibutils-libs    Shared libraries used by ibutils binaries
    ibutils         OpenIB Mellanox InfiniBand Diagnostic Tools

#apt-get install infiniband-diags
    infiniband-diags:   OpenFabrics Alliance InfiniBand Diagnostic Tools

#apt-get install perftest
    perftest: IB Performance tests

#apt-get install mstflint
    mstflint: Mellanox Firmware Burning and Diagnostics Tools

# apt-cache search infiniband
grub-ipxe - Network booting from GRUB using iPXE
ibverbs-providers - User space provider drivers for libibverbs
ipxe - PXE boot firmware
ipxe-qemu - PXE boot firmware - ROM images for qemu
ipxe-qemu-256k-compat-efi-roms - PXE boot firmware - Compat EFI ROM images for qemu
libibumad-dev - Development files for libibumad
libibumad3 - InfiniBand Userspace Management Datagram (uMAD) library
libibverbs-dev - Development files for the libibverbs library
libibverbs1 - Library for direct userspace use of RDMA (InfiniBand/iWARP)
librdmacm-dev - Development files for the librdmacm library
librdmacm1 - Library for managing RDMA connections
tgt - Linux SCSI target user-space daemon and tools
tgt-dbg - Linux SCSI target user-space daemon and tools - debug symbols
collectl - Utility to collect Linux performance data
ctdb - clustered database to store temporary data
dapl2-utils - utilities for use with the DAPL libraries
glusterfs-client - clustered file-system (client package)
glusterfs-common - GlusterFS common libraries and translator modules
glusterfs-server - clustered file-system (server package)
ibacm - InfiniBand Communication Manager Assistant (ACM)
ibsim-utils - InfiniBand fabric simulator utilities
ibutils - InfiniBand network utilities
ibverbs-utils - Examples for the libibverbs library
infiniband-diags - InfiniBand diagnostic programs
libdapl-dev - development files for the DAPL libraries
libdapl2 - Direct Access Programming Library (DAPL)
libibdm-dev - Development files for the libibdm library
libibdm1 - InfiniBand network diagnostic library
libibmad-dev - Development files for libibmad
libibmad5 - Infiniband Management Datagram (MAD) library
libibnetdisc-dev - InfiniBand diagnostics library headers
libibnetdisc5 - InfiniBand diagnostics library
libopensm-dev - Header files for compiling against libopensm
libopensm5a - InfiniBand subnet manager library
libosmcomp3 - InfiniBand subnet manager - component library
libosmvendor4 - InfiniBand subnet manager - vendor library
libpgm-5.2-0 - OpenPGM shared library
libpgm-dbg - OpenPGM debugging symbols
libpgm-dev - OpenPGM development files
libumad2sim0 - InfiniBand fabric simulator
opensm - InfiniBand subnet manager
opensm-doc - Documentation for the InfiniBand subnet manager
perftest - Infiniband verbs performance tests
rdma-core - RDMA core userspace infrastructure and documentation
rdmacm-utils - Examples for the librdmacm library
srptools - Tools for Infiniband attached storage (SRP)
tgt-rbd - Linux SCSI target user-space daemon and tools - RBD support

Ubuntu Installation: 官方建議安裝 參考就好
Run the following installation commands on both servers:
# apt-get install libmlx4-1 infiniband-diags ibutils ibverbs-utils rdmacm-utils perftest

**  InfiniBand 基本運行在IB 模式, 使用 mlxconfig 將改為 ETH 模式
# mstconfig -d 01:00.0 set LINK_TYPE_P1=2 LINK_TYPE_P2=2

Device #1:
----------

Device type:    ConnectX5     
PCI device:     01:00.0       

Configurations:                              Next Boot       New
         LINK_TYPE_P1                        IB(1)           ETH(2)       
         LINK_TYPE_P2                        IB(1)           ETH(2)       

Apply new Configuration? ? (y/n) [n] : y
Applying... Done!
-I- Please reboot machine to load new configurations.

重開機後就可以完成! 設定為ETH模式!

** ISER enable, 確認 iser module 啟用
# modprobe ib_iser

# lsmod | grep iser
ib_iser                49152  0
rdma_cm                61440  3 rpcrdma,ib_iser,rdma_ucm
libiscsi               53248  3 libiscsi_tcp,iscsi_tcp,ib_iser
scsi_transport_iscsi    98304  4 iscsi_tcp,ib_iser,libiscsi
ib_core               221184  10 rdma_cm,ib_ipoib,rpcrdma,iw_cm,ib_iser,ib_umad,rdma_ucm,ib_uverbs,mlx5_ib,ib_cm


**  使用 ibstat 確認狀態, 想要速度在100G有幾個限制,
    1. PCIE SLOT 為Gen3 X16
    2. 確定連接的Infiniband cable 有支援到 100G
 
# ibstat
CA 'mlx5_0'
        CA type: MT4119
        Number of ports: 1
        Firmware version: 16.24.1000
        Hardware version: 0
        Node GUID: 0x1c34da03005d4508
        System image GUID: 0x1c34da03005d4508
        Port 1:
                State: Active
                Physical state: LinkUp
                Rate: 100
                Base lid: 0
                LMC: 0
                SM lid: 0
                Capability mask: 0x04010000
                Port GUID: 0x1e34dafffe5d4508
                Link layer: Ethernet
CA 'mlx5_1'
        CA type: MT4119
        Number of ports: 1
        Firmware version: 16.24.1000
        Hardware version: 0
        Node GUID: 0x1c34da03005d4509
        System image GUID: 0x1c34da03005d4508
        Port 1:
                State: Down
                Physical state: Disabled
                Rate: 40
                Base lid: 0
                LMC: 0
                SM lid: 0
                Capability mask: 0x04010000
                Port GUID: 0x1e34dafffe5d4509
                Link layer: Ethernet

# lspci
01:00.0 Ethernet controller: Mellanox Technologies MT27800 Family [ConnectX-5]
01:00.1 Ethernet controller: Mellanox Technologies MT27800 Family [ConnectX-5]

# ifconfig -a
enp0s31f6: flags=4163<UP,BROADCAST,RUNNING,MULTICAST>  mtu 1500
        inet 10.10.8.55  netmask 255.255.255.0  broadcast 10.10.8.255
        inet6 fe80::428d:5cff:feb4:af78  prefixlen 64  scopeid 0x20<link>
        ether 40:8d:5c:b4:af:78  txqueuelen 1000  (Ethernet)
        RX packets 243241  bytes 28357786 (28.3 MB)
        RX errors 0  dropped 43816  overruns 0  frame 0
        TX packets 212004  bytes 229846081 (229.8 MB)
        TX errors 0  dropped 0 overruns 0  carrier 0  collisions 0
        device interrupt 16  memory 0xed200000-ed220000

enp1s0f0: flags=4163<UP,BROADCAST,RUNNING,MULTICAST>  mtu 9000
        inet 10.10.10.1  netmask 255.255.255.0  broadcast 10.10.10.255
        inet6 fe80::1e34:daff:fe5d:4508  prefixlen 64  scopeid 0x20<link>
        ether 1c:34:da:5d:45:08  txqueuelen 1000  (Ethernet)
        RX packets 38564681  bytes 258283792450 (258.2 GB)
        RX errors 0  dropped 10  overruns 0  frame 0
        TX packets 52412745  bytes 433726224495 (433.7 GB)
        TX errors 0  dropped 0 overruns 0  carrier 0  collisions 0

enp1s0f1: flags=4099<UP,BROADCAST,MULTICAST>  mtu 1500
        ether 1c:34:da:5d:45:09  txqueuelen 1000  (Ethernet)
        RX packets 0  bytes 0 (0.0 B)
        RX errors 0  dropped 0  overruns 0  frame 0
        TX packets 0  bytes 0 (0.0 B)
        TX errors 0  dropped 0 overruns 0  carrier 0  collisions 0

lo: flags=73<UP,LOOPBACK,RUNNING>  mtu 65536
        inet 127.0.0.1  netmask 255.0.0.0
        inet6 ::1  prefixlen 128  scopeid 0x10<host>
        loop  txqueuelen 1000  (Local Loopback)
        RX packets 3216  bytes 217429 (217.4 KB)
        RX errors 0  dropped 0  overruns 0  frame 0
        TX packets 3216  bytes 217429 (217.4 KB)
        TX errors 0  dropped 0 overruns 0  carrier 0  collisions 0

設定 Server ip 與 Client ip, 我們皆使用第一個PORT連接
Setting Server ip
# ifconfig enp1s0f0 up 10.10.10.1/24 mtu 9000
Setting Client ip
# ifconfig enp1s0f0 up 10.10.10.2/24 mtu 9000
     

**  測試跑分 使用 iperf 測試傳輸速度
      另外需要numactl 綁定CPUID, 以避免NUMA 訪問的性能問題. 初步研究應該只有多CPU的server borad 有差別!
# apt-get install numactl 
# apt-get install iperf

** 確定平台幾個CPU NODE
# numactl --hardware

Server:  設定
# numactl --cpunodebind=0 iperf -s -P8 -w 256K
------------------------------------------------------------
Server listening on TCP port 5001
TCP window size:  416 KByte (WARNING: requested  256 KByte)
------------------------------------------------------------

初步會在這邊等待Client 連線


Clietn:  設定
# numactl --cpunodebind=0 iperf -c 10.10.10.1  -t 60 -P8 -w 256K
------------------------------------------------------------
Client connecting to 10.10.10.1, TCP port 5001
TCP window size:  416 KByte (WARNING: requested  256 KByte)
------------------------------------------------------------
[  9] local 10.10.10.2 port 53176 connected with 10.10.10.1 port 5001
[ 10] local 10.10.10.2 port 53178 connected with 10.10.10.1 port 5001
[  4] local 10.10.10.2 port 53166 connected with 10.10.10.1 port 5001
[  8] local 10.10.10.2 port 53174 connected with 10.10.10.1 port 5001
[  7] local 10.10.10.2 port 53172 connected with 10.10.10.1 port 5001
[  3] local 10.10.10.2 port 53164 connected with 10.10.10.1 port 5001
[  6] local 10.10.10.2 port 53170 connected with 10.10.10.1 port 5001
[  5] local 10.10.10.2 port 53168 connected with 10.10.10.1 port 5001


Server 在 Client 連線後會顯示連線狀態
root@sam:/home/sam# numactl --cpunodebind=0 iperf -s -P8 -w 256K
------------------------------------------------------------
Server listening on TCP port 5001
TCP window size:  416 KByte (WARNING: requested  256 KByte)
------------------------------------------------------------
[  4] local 10.10.10.1 port 5001 connected with 10.10.10.2 port 53164
[  5] local 10.10.10.1 port 5001 connected with 10.10.10.2 port 53166
[  6] local 10.10.10.1 port 5001 connected with 10.10.10.2 port 53168
[  7] local 10.10.10.1 port 5001 connected with 10.10.10.2 port 53172
[  8] local 10.10.10.1 port 5001 connected with 10.10.10.2 port 53170
[  9] local 10.10.10.1 port 5001 connected with 10.10.10.2 port 53174
[ 10] local 10.10.10.1 port 5001 connected with 10.10.10.2 port 53176
[ 11] local 10.10.10.1 port 5001 connected with 10.10.10.2 port 53178

Server 測試完成狀態
root@sam:/home/sam# numactl --cpunodebind=0 iperf -s -P8 -w 256K
------------------------------------------------------------
Server listening on TCP port 5001
TCP window size:  416 KByte (WARNING: requested  256 KByte)
------------------------------------------------------------
[  4] local 10.10.10.1 port 5001 connected with 10.10.10.2 port 53164
[  5] local 10.10.10.1 port 5001 connected with 10.10.10.2 port 53166
[  6] local 10.10.10.1 port 5001 connected with 10.10.10.2 port 53168
[  7] local 10.10.10.1 port 5001 connected with 10.10.10.2 port 53172
[  8] local 10.10.10.1 port 5001 connected with 10.10.10.2 port 53170
[  9] local 10.10.10.1 port 5001 connected with 10.10.10.2 port 53174
[ 10] local 10.10.10.1 port 5001 connected with 10.10.10.2 port 53176
[ 11] local 10.10.10.1 port 5001 connected with 10.10.10.2 port 53178
[ ID] Interval       Transfer     Bandwidth
[  5]  0.0-60.0 sec  72.4 GBytes  10.4 Gbits/sec
[  8]  0.0-60.0 sec  70.3 GBytes  10.1 Gbits/sec
[ 10]  0.0-60.0 sec  72.8 GBytes  10.4 Gbits/sec
[ 11]  0.0-60.0 sec  70.3 GBytes  10.1 Gbits/sec
[  4]  0.0-60.0 sec  74.2 GBytes  10.6 Gbits/sec
[  6]  0.0-60.0 sec  73.0 GBytes  10.4 Gbits/sec
[  7]  0.0-60.0 sec  74.3 GBytes  10.6 Gbits/sec
[  9]  0.0-60.0 sec  72.2 GBytes  10.3 Gbits/sec

Client 測試完成狀態
root@ubuntu_1804_server:/home/sam# numactl --cpunodebind=0 iperf -c 10.10.10.1  -t 60 -P8 -w 256K
------------------------------------------------------------
Client connecting to 10.10.10.1, TCP port 5001
TCP window size:  416 KByte (WARNING: requested  256 KByte)
------------------------------------------------------------
[  9] local 10.10.10.2 port 53176 connected with 10.10.10.1 port 5001
[ 10] local 10.10.10.2 port 53178 connected with 10.10.10.1 port 5001
[  4] local 10.10.10.2 port 53166 connected with 10.10.10.1 port 5001
[  8] local 10.10.10.2 port 53174 connected with 10.10.10.1 port 5001
[  7] local 10.10.10.2 port 53172 connected with 10.10.10.1 port 5001
[  3] local 10.10.10.2 port 53164 connected with 10.10.10.1 port 5001
[  6] local 10.10.10.2 port 53170 connected with 10.10.10.1 port 5001
[  5] local 10.10.10.2 port 53168 connected with 10.10.10.1 port 5001
[ ID] Interval       Transfer     Bandwidth
[  9]  0.0-60.0 sec  72.8 GBytes  10.4 Gbits/sec
[ 10]  0.0-60.0 sec  70.3 GBytes  10.1 Gbits/sec
[  4]  0.0-60.0 sec  72.4 GBytes  10.4 Gbits/sec
[  8]  0.0-60.0 sec  72.2 GBytes  10.3 Gbits/sec
[  7]  0.0-60.0 sec  74.3 GBytes  10.6 Gbits/sec
[  3]  0.0-60.0 sec  74.2 GBytes  10.6 Gbits/sec
[  6]  0.0-60.0 sec  70.3 GBytes  10.1 Gbits/sec
[  5]  0.0-60.0 sec  73.0 GBytes  10.5 Gbits/sec
[SUM]  0.0-60.0 sec   580 GBytes  83.0 Gbits/sec

參考資料:
https://zhuanlan.zhihu.com/p/74082377
https://community.mellanox.com/s/article/getting-started-with-connectx-5-100gb-s-adapters-for-linux
https://community.mellanox.com/s/article/howto-setup-rdma-connection-using-inbox-driver--rhel--ubuntu-x
https://community.mellanox.com/s/article/howto-configure-lio-enabled-with-iser-for-ubuntu-14-04-inbox-driver

這是重編driver 自行安裝方式
http://benjr.tw/28088

假如有使用LIO 架設 iscsi disk
# lsscsi
[1:0:0:0]    disk    ATA      INTEL SSDSC2CT24 335t  /dev/sda
[5:0:0:0]    cd/dvd  ATAPI    DVD D  DH16D2S   EP52  /dev/sr0
[6:0:0:0]    disk    LIO-ORG  iscsi-ramdisk    4.0   /dev/sdb

root@ubuntu_1804_server:/home/sam# dd if=/dev/sdb of=/dev/null bs=64k iflag=direct
65536+0 records in
65536+0 records out
4294967296 bytes (4.3 GB, 4.0 GiB) copied, 6.98333 s, 615 MB/s

root@ubuntu_1804_server:/home/sam# dd if=/dev/sdb of=/dev/null bs=1M iflag=direct
4096+0 records in
4096+0 records out
4294967296 bytes (4.3 GB, 4.0 GiB) copied, 1.77295 s, 2.4 GB/s


** 其他方式確認device status
ibv_devinfo

hca_id: mlx5_0
        transport:                      InfiniBand (0)
        fw_ver:                         16.24.1000
        node_guid:                      1c34:da03:0057:49ec
        sys_image_guid:                 1c34:da03:0057:49ec
        vendor_id:                      0x02c9
        vendor_part_id:                 4119
        hw_ver:                         0x0
        board_id:                       MT_0000000008
        phys_port_cnt:                  1
                port:   1
                        state:                  PORT_ACTIVE (4)
                        max_mtu:                4096 (5)
                        active_mtu:             4096 (5)
                        sm_lid:                 1
                        port_lid:               1
                        port_lmc:               0x00
                        link_layer:             InfiniBand

hca_id: mlx5_1
        transport:                      InfiniBand (0)
        fw_ver:                         16.24.1000
        node_guid:                      1c34:da03:0057:49ed
        sys_image_guid:                 1c34:da03:0057:49ec
        vendor_id:                      0x02c9
        vendor_part_id:                 4119
        hw_ver:                         0x0
        board_id:                       MT_0000000008
        phys_port_cnt:                  1
                port:   1
                        state:                  PORT_DOWN (1)
                        max_mtu:                4096 (5)
                        active_mtu:             4096 (5)
                        sm_lid:                 0
                        port_lid:               65535
                        port_lmc:               0x00
                        link_layer:             InfiniBand


2020年3月20日 星期五

Ubuntu 18.04 install iscsi server and client

** Ubuntur 18.04 setting ISCSI

Install the targetcli
# apt-get install targetcli-fb

Create the backend storage device
# targetcli 
targetcli shell version 2.1.fb43
Copyright 2011-2013 by Datera, Inc and others.
For help on commands, type 'help'.

/>

/> ls
o- / ......................................................................................................................... [...]
  o- backstores .............................................................................................................. [...]
  | o- block .................................................................................................. [Storage Objects: 0]
  | o- fileio ................................................................................................. [Storage Objects: 0]
  | o- pscsi .................................................................................................. [Storage Objects: 0]
  | o- ramdisk ................................................................................................ [Storage Objects: 0]
  o- iscsi ............................................................................................................ [Targets: 0]
  o- loopback ......................................................................................................... [Targets: 0]
  o- srpt ............................................................................................................. [Targets: 0]
  o- vhost ............................................................................................................ [Targets: 0]
/>

To create a backstore, you can cd to backstores/block or backstores/fileio and create the respective backstore.
/> cd /backstores/block
/backstores/block>

/backstores/block> create name=iscsi-disk01 dev=/dev/nullb0
Created block storage object iscsi-disk01 using /dev/nullb0.
/backstores/block>

or

/backstores> cd fileio
/backstores/fileio>

/backstores/fileio> create iscsi_file /tmp/iscsi_disks/disk01.img 10G
/tmp/iscsi_disks/disk01.img exists, using its size (1073741824 bytes) instead
Created fileio iscsi_file with size 1073741824

PS. 要確定建立 /tmp/ iscsi_disks 資料夾

跳到 / , 重新ls 查看建立資料
/backstores/fileio> cd /
/> ls
o- / ......................................................................................................................... [...]
  o- backstores .............................................................................................................. [...]
  | o- block .................................................................................................. [Storage Objects: 1]
  | | o- iscsi-disk01 .............................................................. [/dev/nullb0 (250.0GiB) write-thru deactivated]
  | o- fileio ................................................................................................. [Storage Objects: 1]
  | | o- iscsi_file .................................................. [/tmp/iscsi_disks/disk01.img (1.0GiB) write-back deactivated]
  | o- pscsi .................................................................................................. [Storage Objects: 0]
  | o- ramdisk ................................................................................................ [Storage Objects: 0]
  o- iscsi ............................................................................................................ [Targets: 0]
  o- loopback ......................................................................................................... [Targets: 0]
  o- srpt ............................................................................................................. [Targets: 0]
  o- vhost ............................................................................................................ [Targets: 0]
/>

block        #用 block 方式分享  /dev/sda /dev/sdb ...
fileio        #將檔案建於 file system 之上, 再通過 iSCSI 當做 block device 分享出去
pscsi         #連結的設備原本就是 iSCSI 設備時,選 pscsi
remdisk    #不需長久儲存時,可用 ramdisk 分享

Create the iSCSI Target and Portal
naming rule :
[ iqn.(year)-(month).(reverse of domain name):(name of your choice) ]

/> cd iscsi
/iscsi>

/iscsi>  create iqn.2020-03.com.accusys.storage.target1
Created target iqn.2020-03.com.accusys.storage.target1.
Created TPG 1.
Global pref auto_add_default_portal=true
Created default portal listening on all IPs (0.0.0.0), port 3260.
/iscsi>

As you can see on the last line, a default portal listening on TCP port 3260 is created when the target is created. To verify this, run ls command.

Set up the LUN

/iscsi> cd /iscsi/iqn.2020-03.com.accusys.storage.target1/tpg1/luns
/iscsi/iqn.20...et1/tpg1/luns>

/iscsi/iqn.20...et1/tpg1/luns> ls /
o- / ......................................................................................................................... [...]
  o- backstores .............................................................................................................. [...]
  | o- block .................................................................................................. [Storage Objects: 1]
  | | o- iscsi-disk01 .............................................................. [/dev/nullb0 (250.0GiB) write-thru deactivated]
  | o- fileio ................................................................................................. [Storage Objects: 1]
  | | o- iscsi_file .................................................. [/tmp/iscsi_disks/disk01.img (1.0GiB) write-back deactivated]
  | o- pscsi .................................................................................................. [Storage Objects: 0]
  | o- ramdisk ................................................................................................ [Storage Objects: 0]
  o- iscsi ............................................................................................................ [Targets: 1]
  | o- iqn.2020-03.com.accusys.storage.target1 ........................................................................... [TPGs: 1]
  |   o- tpg1 ............................................................................................... [no-gen-acls, no-auth]
  |     o- acls .......................................................................................................... [ACLs: 0]
  |     o- luns .......................................................................................................... [LUNs: 0]
  |     o- portals .................................................................................................... [Portals: 1]
  |       o- 0.0.0.0:3260 ..................................................................................................... [OK]
  o- loopback ......................................................................................................... [Targets: 0]
  o- srpt ............................................................................................................. [Targets: 0]
  o- vhost ............................................................................................................ [Targets: 0]
/iscsi/iqn.20...et1/tpg1/luns> create /backstores/block/iscsi-disk01 
Created LUN 0.
/iscsi/iqn.20...et1/tpg1/luns> create /backstores/fileio/iscsi_file
Created LUN 1.
/iscsi/iqn.20...et1/tpg1/luns>

Set up Access Control Lists (ACL)
ACL is used to specify the clients (iSCSI intiators) allowed to access the iSCSI target backstores.
To cteate an ACL for an intiator, run create command with IQN of the initiator just like as did above.

/> cd /iscsi/iqn.2020-03.com.accusys.storage.target1/tpg1/acls
/iscsi/iqn.20...et1/tpg1/acls> create iqn.2020-03.com.accusys.storage.initiator
Created Node ACL for iqn.2020-03.com.accusys.storage.initiator
Created mapped LUN 1.
Created mapped LUN 0.
/iscsi/iqn.20...et1/tpg1/acls>

Set User ID and password for iSCSI initiator authentication
/> cd /iscsi/iqn.2020-03.com.accusys.storage.target1/tpg1/acls/iqn.2020-03.com.accusys.storage.initiator
/iscsi/iqn.20...age.initiator>

/iscsi/iqn.20...age.initiator>  set auth userid=username  // 指定loging 的 帳號 = username
Parameter userid is now 'username'.
/iscsi/iqn.20...age.initiator> set auth password=password // 指定loging 的 密碼 = password
Parameter password is now 'password'.

/iscsi/iqn.20...age.initiator> exit
Global pref auto_save_on_exit=true
Last 10 configs saved in /etc/rtslib-fb-target/backup.
Configuration saved to /etc/rtslib-fb-target/saveconfig.json

PS. Create Ram Disk named test1:

/> backstores/ramdisk/ create name=test1 nullio=true size=4G


PS. iser setting.
/iscsi/iqn.20.../0.0.0.0:3260> pwd
/iscsi/iqn.2020-03.com.accusys.storage.target1/tpg1/portals/0.0.0.0:3260

/iscsi/iqn.20.../0.0.0.0:3260> enable_iser true
iSER enable now: True
/iscsi/iqn.20.../0.0.0.0:3260> ls
o- 0.0.0.0:3260 ............................................................................................................. [iser]

/iscsi/iqn.20.../0.0.0.0:3260> enable_iser false
iSER enable now: False
/iscsi/iqn.20.../0.0.0.0:3260> ls
o- 0.0.0.0:3260 ............................................................................................................... [OK]


PS. Parameter setting
/iscsi/iqn.20....target1/tpg1> pwd
/iscsi/iqn.2020-03.com.accusys.storage.target1/tpg1

/iscsi/iqn.20....target1/tpg1> set parameter MaxConnections=32
Parameter MaxConnections is now '32'.

/iscsi/iqn.20....target1/tpg1> set attribute authentication=0 demo_mode_write_protect=0 generate_node_acls=1 cache_dynamic_acls=1
Parameter authentication is now '0'.
Parameter demo_mode_write_protect is now '0'.
Parameter generate_node_acls is now '1'.
Parameter cache_dynamic_acls is now '1'.

PARAMETER CONFIG GROUP
======================
AuthMethod=string
--------------------
Authentication method used by the TPG.

DataDigest=string
--------------------
If set to CRC32C, the integrity of the PDU data part is verified.

DataPDUInOrder=yesno
-----------------------
If set to Yes, the data PDUs within sequences must be in order.

DataSequenceInOrder=yesno
----------------------------
If set to Yes, the data sequences must be in order.

DefaultTime2Retain=number
----------------------------
Maximum time, in seconds, after an initial wait, before which an active task reassignment is still possible after an unexpected connection termination or a connection reset.

DefaultTime2Wait=number
--------------------------
Minimum time, in seconds, to wait before attempting an explicit/implicit logout or an active task reassignment after an unexpected connection termination or a connection reset.

ErrorRecoveryLevel=number
----------------------------
Recovery levels represent a combination of recovery capabilities.

FirstBurstLength=number
--------------------------
Maximum amount in bytes of unsolicited data an initiator may send.

HeaderDigest=string
----------------------
If set to CRC32C, the integrity of the PDU header part is verified.

IFMarkInt=string
-------------------
Deprecated according to RFC 7143.

IFMarker=yesno
-----------------
Deprecated according to RFC 7143.

ImmediateData=string
-----------------------
Immediate data support.

InitialR2T=yesno
-------------------
If set to No, the default use of R2T (Ready To Transfer) is disabled.

MaxBurstLength=number
------------------------
Maximum SCSI data payload in bytes in a Data-In or a solicited Data-Out iSCSI sequence.

MaxConnections=number
------------------------
Maximum number of connections acceptable.

MaxOutstandingR2T=number
---------------------------
Maximum number of outstanding R2Ts per task.

MaxRecvDataSegmentLength=number
----------------------------------
Maximum data segment length in bytes the target can receive in an iSCSI PDU.

MaxXmitDataSegmentLength=number
----------------------------------
Outgoing MaxRecvDataSegmentLength sent over the wire during iSCSI login response.

OFMarkInt=string
-------------------
Deprecated according to RFC 7143.

OFMarker=yesno
-----------------
Deprecated according to RFC 7143.

TargetAlias=string
---------------------
Human-readable target name or description.

ATTRIBUTE CONFIG GROUP
======================
authentication=number
------------------------
If set to 1, enforce authentication for this TPG.

cache_dynamic_acls=number
----------------------------
If set to 1 in demo mode, cache dynamically generated ACLs.

default_cmdsn_depth=number
-----------------------------
Default CmdSN (Command Sequence Number) depth.

default_erl=number
---------------------
Default Error Recovery Level.

demo_mode_discovery=number
-----------------------------
If set to 1 in demo mode, enable discovery.

demo_mode_write_protect=number
---------------------------------
If set to 1 in demo mode, prevent writes to LUNs.

fabric_prot_type=number
--------------------------
Fabric DIF protection type.

generate_node_acls=number
----------------------------
If set to 1, allow all initiators to login (i.e. demo mode).

login_keys_workaround=string
-------------------------------

login_timeout=number
-----------------------
Login timeout value in seconds.

netif_timeout=number
-----------------------
NIC failure timeout in seconds.

prod_mode_write_protect=number
---------------------------------
If set to 1, prevent writes to LUNs.

t10_pi=number
----------------
If set to 1, enable T10 Protection Information.

tpg_enabled_sendtargets=number
---------------------------------
If set to 1, the SendTargets discovery response advertises the TPG only if the TPG is enabled.


**Ubuntu Iscsi clent
install iSCSI initiator packages
# apt-get install open-iscsi

Edit the /etc/iscsi/initiatorname.iscsi and set the IQN of the initiator to be just the same as the one we created on the target
above you can comment out the existing and add a new one as shown below.
vi /etc/iscsi/initiatorname.iscsi 

## DO NOT EDIT OR REMOVE THIS FILE!
## If you remove this file, the iSCSI daemon will not start.
## If you change the InitiatorName, existing access control lists
## may reject this initiator.  The InitiatorName must be unique
## for each iSCSI initiator.  Do NOT duplicate iSCSI InitiatorNames.
#InitiatorName=iqn.1993-08.org.debian:01:c27157ed3fb4
InitiatorName=iqn.2020-03.com.accusys.storage.initiator

Edit the /etc/iscsi/iscsid.conf configuration file to set the authentication method and specify the username and password defined above, under the CHAP settings
# vi /etc/iscsi/iscsid.conf 

51 # CHAP Settings
52 # *************
53
54 # To enable CHAP authentication set node.session.auth.authmethod
55 # to CHAP. The default is None.
56 node.session.auth.authmethod = CHAP      <---- uncomment this line
57
58 # To set a CHAP username and password for initiator
59 # authentication by the target(s), uncomment the following lines:
60 node.session.auth.username = username    <---- uncomment and set the right user
61 node.session.auth.password = password    <---- uncomment and set the right password

Save the configuration file and restart and enable both iscsid and iscsi services.

# systemctl restart iscsid open-iscsi
# systemctl enable iscsid open-iscsi


Run target discovery against our iSCSI target server to find out the shared targets.
# iscsiadm -m discovery -t st -p 10.10.8.22         
iscsiadm: config file line 1 do not has value
10.10.8.22:3260,1 iqn.2020-03.com.accusys.storage.target1

We need to login or logout to it. Run the command below to login to the target.
# iscsiadm -m node --login 
# iscsiadm -m node --logout
Logging in to [iface: default, target: iqn.2020-03.com.accusys.storage.target1, portal: 10.10.8.55,3260] (multiple)
Logging in to [iface: default, target: iqn.2020-03.com.accusys.storage.target1, portal: 10.10.8.22,3260] (multiple)
Login to [iface: default, target: iqn.2020-03.com.accusys.storage.target1, portal: 10.10.8.55,3260] successful.
Login to [iface: default, target: iqn.2020-03.com.accusys.storage.target1, portal: 10.10.8.22,3260] successful.


You can also login or logout to target by specifying the iqn as in:
# iscsiadm -m node -T iqn.2020-03.com.accusys.storage.target1 -p 10.10.8.22 --login
# iscsiadm -m node -T iqn.2020-03.com.accusys.storage.target1 -p 10.10.8.22 --logout

Once logged in, you can run the following command to see the details of the established session.
# iscsiadm -m node -T iqn.2020-03.com.accusys.storage.target1 -l
Logging in to [iface: default, target: iqn.2020-03.com.accusys.storage.target1, portal: 10.10.8.55,3260] (multiple)
Logging in to [iface: default, target: iqn.2020-03.com.accusys.storage.target1, portal: 10.10.8.22,3260] (multiple)
Login to [iface: default, target: iqn.2020-03.com.accusys.storage.target1, portal: 10.10.8.55,3260] successful.
Login to [iface: default, target: iqn.2020-03.com.accusys.storage.target1, portal: 10.10.8.22,3260] successful.

# iscsiadm -m session -o show 
tcp: [7] 10.10.8.55:3260,1 iqn.2020-03.com.accusys.storage.target1 (non-flash)
tcp: [8] 10.10.8.22:3260,1 iqn.2020-03.com.accusys.storage.target1 (non-flash)

# iscsiadm -m session -o show -P 1
Target: iqn.2020-03.com.accusys.storage.target1 (non-flash)
        Current Portal: 10.10.8.55:3260,1
        Persistent Portal: 10.10.8.55:3260,1
                **********
                Interface:
                **********
                Iface Name: default
                Iface Transport: tcp
                Iface Initiatorname: iqn.2020-03.com.accusys.storage.initiator
                Iface IPaddress: 10.10.8.36
                Iface HWaddress: <empty>
                Iface Netdev: <empty>
                SID: 7
                iSCSI Connection State: LOGGED IN
                iSCSI Session State: LOGGED_IN
                Internal iscsid Session State: NO CHANGE
        Current Portal: 10.10.8.22:3260,1
        Persistent Portal: 10.10.8.22:3260,1
                **********
                Interface:
                **********
                Iface Name: default
                Iface Transport: tcp
                Iface Initiatorname: iqn.2020-03.com.accusys.storage.initiator
                Iface IPaddress: 10.10.8.36
                Iface HWaddress: <empty>
                Iface Netdev: <empty>
                SID: 8
                iSCSI Connection State: LOGGED IN
                iSCSI Session State: LOGGED_IN
                Internal iscsid Session State: NO CHANGE

# lsblk --scsi
NAME HCTL       TYPE VENDOR   MODEL             REV TRAN
sda  2:0:0:0    disk VMware,  VMware Virtual S 1.0  spi
sdb  39:0:0:0   disk LIO-ORG  iscsi-disk01     4.0  iscsi
sdc  40:0:0:0   disk LIO-ORG  iscsi-disk01     4.0  iscsi
sdd  40:0:0:1   disk LIO-ORG  iscsi_file       4.0  iscsi
sde  39:0:0:1   disk LIO-ORG  iscsi_file       4.0  iscsi
sr0  4:0:0:0    rom  NECVMWar VMware SATA CD01 1.00 sata

2020年3月18日 星期三

[Ubuntu 18.04] 多張網卡綁定為一張網卡

Ubuntu16.04 雙網卡綁定
環境 : 系統: Ubuntu16.04
網卡: em1 em2
ip:192.168.0.46
安裝 ifenslave 
sudo apt-get install ifenslave
echo "bonding" >>/etc/modules
auto bond0
iface bond0 inet static
        address 192.168.0.46
        netmask 255.255.255.0
gateway 192.168.0.1
        bond-slaves none
        bond-mode active-backup
        bond-miimon 100
  
auto eno1
iface eno1 inet manual
        bond-master bond0
        bond-primary eno1 eno2
  
auto eno2
iface eno2 inet manual
        bond-master bond0
        bond-primary eno1 eno2


Ubuntu18.04 靜態網卡配置
Ubuntu 18.04 採用netplan作為網絡配置管理,與16.04及之前的版本區別很大
IP配置
sudo vi /etc/netplan/01-netcfg.yaml #最後的名字因服務器而異。
 
重啟網卡
sudo netplan apply 
DNS配置
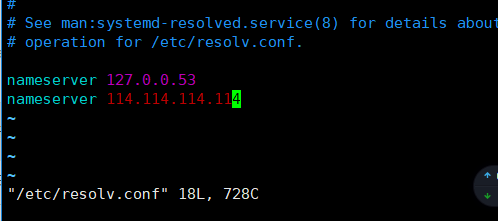
DNS還是使用resolv.conf
sudo vi /etc/resolv.conf
 
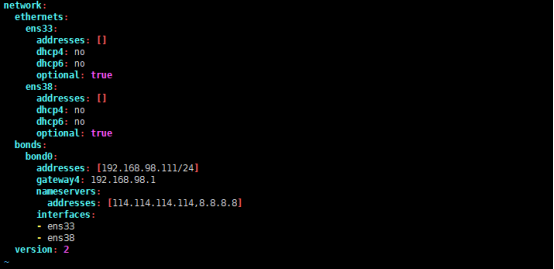
ubuntu18.04雙網卡綁定
vim /etc/netpan/50-cloud-init.yaml

network:
    ethernets:
        ens33:
        addresses: []
        dhcp4: no
        dhcp6: no
        optional: true
    ens38:
        addresses: []
        dhcp4: no
        dhcp6: no
        optional: true
    bonds:
        bond0:
            addresses: [192.168.98.112/24]
            gateway4: 192.168.98.1
            nameservers:
                addresses: [114.114.114.114,8.8.8.8] 
            interfaces:
                - ens33
                - ens38
            version: 2

重啟網卡 netplan apply
查看bond狀態
watch -n 1 ifconfig bond0
watch -n 1 ifconfig ens33
watch -n 1 ifconfig ens38


** Intel Corporation Ethernet Controller X710/X557-AT 10GBASE-T 設定
# This file is generated from information provided by the datasource.  Changes
# to it will not persist across an instance reboot.  To disable cloud-init's
# network configuration capabilities, write a file
# /etc/cloud/cloud.cfg.d/99-disable-network-config.cfg with the following:
# network: {config: disabled}
network:
    ethernets:
        enp0s31f6:
            dhcp4: true
        enp2s0f0:
            dhcp4: no
        enp2s0f1:
            dhcp4: no
        enp2s0f2:
            dhcp4: no
        enp2s0f3:
            dhcp4: no
    bonds:
        bond0:
            addresses: [10.10.8.22/24]
            gateway4: 10.10.8.254
            nameservers:
                addresses: [10.10.0.9,10.10.0.10]
            mtu: 9000
            interfaces:
                    - enp2s0f0
                    - enp2s0f1
                    - enp2s0f2
                    - enp2s0f3
            parameters:
                    lacp-rate: fast
                    mode: balance-alb
                    transmit-hash-policy: layer2

    version: 2
~                  

PS.  [10.10.8.22/24] 後面 /24 
意思就是指 SubnetMASK 有 24 個 「1」,就等於 255.255.255.0
若是 /22,則是 255.255.252.0 (22個 1= 11111111.11111111.11111100.00000000)


** 查看 bond0 相關資訊

# cat /proc/net/bonding/bond0 
Ethernet Channel Bonding Driver: v3.7.1 (April 27, 2011)

Bonding Mode: adaptive load balancing
Primary Slave: None
Currently Active Slave: enp2s0f3
MII Status: up
MII Polling Interval (ms): 100
Up Delay (ms): 0
Down Delay (ms): 0
Peer Notification Delay (ms): 0

Slave Interface: enp2s0f3
MII Status: up
Speed: 1000 Mbps
Duplex: full
Link Failure Count: 0
Permanent HW addr: 3c:fd:fe:69:29:cb
Slave queue ID: 0

Slave Interface: enp2s0f2
MII Status: down
Speed: Unknown
Duplex: Unknown
Link Failure Count: 0
Permanent HW addr: 3c:fd:fe:69:29:ca
Slave queue ID: 0

Slave Interface: enp2s0f1
MII Status: down
Speed: Unknown
Duplex: Unknown
Link Failure Count: 0
Permanent HW addr: 3c:fd:fe:69:29:c9
Slave queue ID: 0

Slave Interface: enp2s0f0
MII Status: up
Speed: 1000 Mbps
Duplex: full
Link Failure Count: 0
Permanent HW addr: 3c:fd:fe:69:29:c8

Slave queue ID: 0


1、Bond的工作模式

Linux bonding驅動提供了一個把多個網絡接口設備捆綁為單個的網絡接口設置來使用,用於網絡負載均衡及網絡冗余。
bonding一共有7種工作模式(mode):

  • 1)、bond=0,(balance-rr) Round-robin policy: (平衡輪詢策略):傳輸數據包順序是依次傳輸,直到最後一個傳輸完畢,此模式提供負載平衡和容錯能力。
  • 2)、bond=1,(active-backup) Active-backup policy:(活動備份策略):只有一個設備處於活動狀態。一個宕掉另一個馬上由備份轉換為主設備。mac地址是外部可見得。此模式提供了容錯能力。
  • 3)、bond=2,(balance-xor) XOR policy:(平衡策略):傳輸根據[(源MAC地址xor目標MAC地址)mod設備數量]的布爾值選擇傳輸設備。 此模式提供負載平衡和容錯能力。
  • 4)、bond=3,(broadcast) Broadcast policy:(廣播策略):將所有數據包傳輸給所有設備。此模式提供了容錯能力。
  • 5)、bond=4,(802.3ad) IEEE 802.3ad Dynamic link aggregation. IEEE 802.3ad 動態鏈接聚合:創建共享相同的速度和雙工設置的聚合組。此模式提供了容錯能力。每個設備需要基於驅動的重新獲取速度和全雙工支持;如果使用交換機,交換機也需啟用 802.3ad 模式。
  • 6)、bond=5,(balance-tlb) Adaptive transmit load balancing(適配器傳輸負載均衡):通道綁定不需要專用的交換機支持。發出的流量根據當前負載分給每一個設備。由當前設備處理接收,如果接受的設 備傳不通就用另一個設備接管當前設備正在處理的mac地址。
  • 7)、bond=6,(balance-alb) Adaptive load balancing: (適配器負載均衡):包括mode5,由 ARP 協商完成接收的負載。bonding驅動程序截獲 ARP在本地系統發送出的請求,用其中之一的硬件地址覆蓋從屬設備的原地址。就像是在服務器上不同的人使用不同的硬件地址一樣。

** 使用 ethtool 了解速度

# ethtool bond0
Settings for bond0:
        Supported ports: [ ]
        Supported link modes:   Not reported
        Supported pause frame use: No
        Supports auto-negotiation: No
        Supported FEC modes: Not reported
        Advertised link modes:  Not reported
        Advertised pause frame use: No
        Advertised auto-negotiation: No
        Advertised FEC modes: Not reported
        Speed: 2000Mb/s
        Duplex: Full
        Port: Other
        PHYAD: 0
        Transceiver: internal
        Auto-negotiation: off
        Link detected: yes